Introduction
In this post, we’ll walk through the process of building a web aPI with FastAPI. FastAPI is a modern, fast (as the name implies), web framework for building APIs with Python. It’s based on standard Python type hints, which makes it easy to use and learn. It’s also very fast, thanks to the use of Starlette and Pydantic.
We’ll build a simple API that allows users to create, read, update, and delete (CRUD) books from a database.
Stack
- FastAPI - for building the API
- PostgreSQL - for the database
- SQLAlchemy - for the ORM
- Alembic - for database migrations
Prerequisites
Before we get started, make sure you have the following installed on your machine:
- Python 3.6+ - You can download Python from python.org. I’m using Python 3.11.4 for this project.
Project overview
We’re going to build a simple API that allows users to create, read, update, and delete (CRUD) books from a database. The API will have the following endpoints:
| Resource | Endpoint | Method | Description |
|---|---|---|---|
| Books | /books | GET | Get a list of books from the database |
| Books | /books/{id} | GET | Get a single book from the database |
| Books | /books | POST | Create a new book and store in the database |
| Books | /books/{id} | PATCH | Update a book record |
| Books | /books/{id} | DELETE | Delete a book record from the database |
Getting Started
Let’s start by creating a new project directory and initializing a new Python project. For this, navigate to the directory where you want to create the project and run the following commands in your terminal:
$ mkdir fastapi-rest-api && cd fastapi-rest-apiVirtual Environment Setup & Install Dependencies
Next, create and activate the virtual environment like this:
$ python3 -m venv venv # create a virtual environment
$ source venv/bin/activate # for Linux/MacOS
$ venv\Scripts\activate.bat # for Windows
You should see the name of the virtual environment in your terminal prompt. This means that the virtual environment is active.

Next, install the project dependencies:
$ pip install fastapi "uvicorn[standard]" "databases[aiosqlite]" sqlalchemy pydantic python-dotenvTo see the list of installed packages, run pip freeze > requirements.txt. This will
create a requirements.txt file in your project root directory.
FastAPI Setup
Now that we have our project initialized and dependencies installed, let’s create a new file called main.py in the project root directory. This is where we’ll write our FastAPI code.
$ touch main.pyNext, open the main.py file in your code editor and add the following code:
from fastapi import FastAPI

app = FastAPI()


@app.get("/")
def home():
    return {"Hello": "World"}
This is the bare minimum code required to create a FastAPI application. We import the FastAPI class from the fastapi module and create a new instance of the FastAPI class.
We then assign the instance to the app variable. Using the app variable, we can define routes and add other functionality to our application, the @app.get("/") decorator defines a route for the home page. When a user visits the home page, the home() function is called and the return value is sent back to the user.
Let’s run the application and see what happens. In your terminal, run the following command:
$ uvicorn main:app --reloadThis will start the application in development mode. The --reload flag tells Uvicorn to reload the application whenever a change is made to the code.
Go to http://localhost:8000 in your browser and you should see the following:

Your browser may show the result in a different way, I’m using a chrome extension called JSON Viewer to format the JSON response.
FastAPI Interactive Docs
One of the best features of FastAPI is the interactive docs. FastAPI automatically generates interactive API documentation for your application. This makes it easy to test your API endpoints and see what data is required for each endpoint.
With your server still running, go to http://localhost:8000/docs in your browser and you should see the following:

The interactive docs are generated using Swagger UI. You can click on the Try it out button to test the endpoint and see the response. You should see the same response as before.
Database Setup
By the end of this posts, we’ll connect to a PostgreSQL database. But, to make the progress easier to follow, we’ll use SQLite for now. SQLite is a lightweight database that doesn’t require a server to run. It’s perfect for development and testing.
SQLAlchemy is a Python SQL ORM (Object Relational Mapper) that makes it easy to interact with a database using Python. It supports multiple database engines including SQLite and PostgreSQL.
from typing import List

import databases
import sqlalchemy
from pydantic import BaseModel

DATABASE_URL = "sqlite:///./data.db"

metadata = sqlalchemy.MetaData()

books = sqlalchemy.Table(
    "books",
    metadata,
    sqlalchemy.Column("id", sqlalchemy.Integer, primary_key=True),
    sqlalchemy.Column("title", sqlalchemy.String),
    sqlalchemy.Column("author", sqlalchemy.String),
    sqlalchemy.Column("description", sqlalchemy.String),
    sqlalchemy.Column("price", sqlalchemy.Float),
)

engine = sqlalchemy.create_engine(
    DATABASE_URL, connect_args={"check_same_thread": False}
)

metadata.create_all(engine)

db = databases.Database(DATABASE_URL)


class BookIn(BaseModel):
    title: str
    author: str
    description: str
    price: float


class Book(BaseModel):
    id: int
    title: str
    author: str
    description: str
    price: float
Let’s break this down:
- We import the
databasesandsqlalchemymodules. - We define the database URL. This is the URL that SQLAlchemy will use to connect to the database. For SQLite, the URL is
sqlite:///data.db. The///indicates that the database is a file on the local filesystem. Thedata.dbpart is the name of the database file. If the file doesn’t exist, it will be created automatically. The name of the file can be anything you want. - We create a
metadataobject. This object will store the database schema. We’ll use it to define the database table. - We create a
books_tableobject. This object represents thebookstable in the database. It has five columns:id,title,author,description, andprice. Theprimary_key=Trueargument tells SQLAlchemy that this column is the primary key. - We create an
engineobject. This object is used to connect to the database. We pass the database URL to thecreate_engine()function. We also passconnect_args={"check_same_thread": False}to the function. This is required for SQLite. It tells SQLAlchemy to allow multiple threads to access the database. - We call the
create_all()method on themetadataobject. This creates the database table if it doesn’t exist. - We create a
dbobject. This object is used to interact with the database. We pass the database URL to theDatabase()class. - Finally, we define our database models using Pydantic.
BookInrepresents the information needed to create a new book in our database.Bookrepresents a book in our database. It has anidfield in addition to the fields inBookIn. Theidfield is used to uniquely identify a book in the database.
Database Connection
To connect to our database, we can use FastAPI app events. Let’s update the main.py file to look like this:
from fastapi import FastAPI

from database import db

app = FastAPI()


@app.on_event("startup")
async def startup():
    await db.connect()


@app.on_event("shutdown")
async def shutdown():
    await db.disconnect()


@app.get("/")
def home():
    return {"Hello": "World"}
We import the db object from the database module. We then define two app events: startup and shutdown. The startup event is called when the application starts. We use it to connect to the database. The shutdown event is called when the application stops. We use it to disconnect from the database.
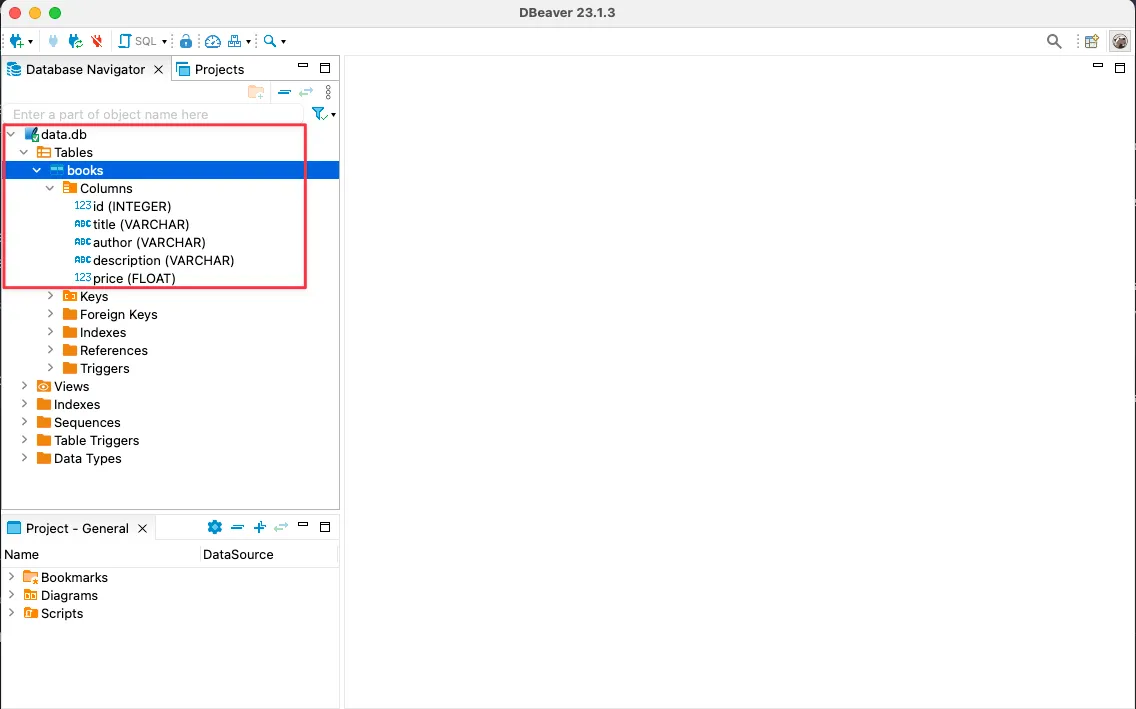
If you restart the server, you should see a data.db file created in your project root directory. You can connect to the database with your tool of choice. Here, I’m using DBeaver.
Because this is a simple example, we’re creating the database and table as soon as our application starts. In a real productions application, you’ll probably want to use something like Alembic to manage your database migrations.
CRUD Operations
Now that we have our database setup, let’s add the CRUD operations. We’ll start with the create operation. In our main.py file, add the following code:
Create
from database import db, books, Book, BookIn

@app.post("/books", response_model=Book, status_code=201)
async def create_book(book: BookIn):
    query = books.insert().values(
        title=book.title,
        author=book.author,
        description=book.description,
        price=book.price,
    )
    last_record_id = await db.execute(query)
    return {**book.model_dump(), "id": last_record_id}
Go to your interactive docs and you should see the new POST endpoint /books. Open it and click the Try it out button. You should see the following:
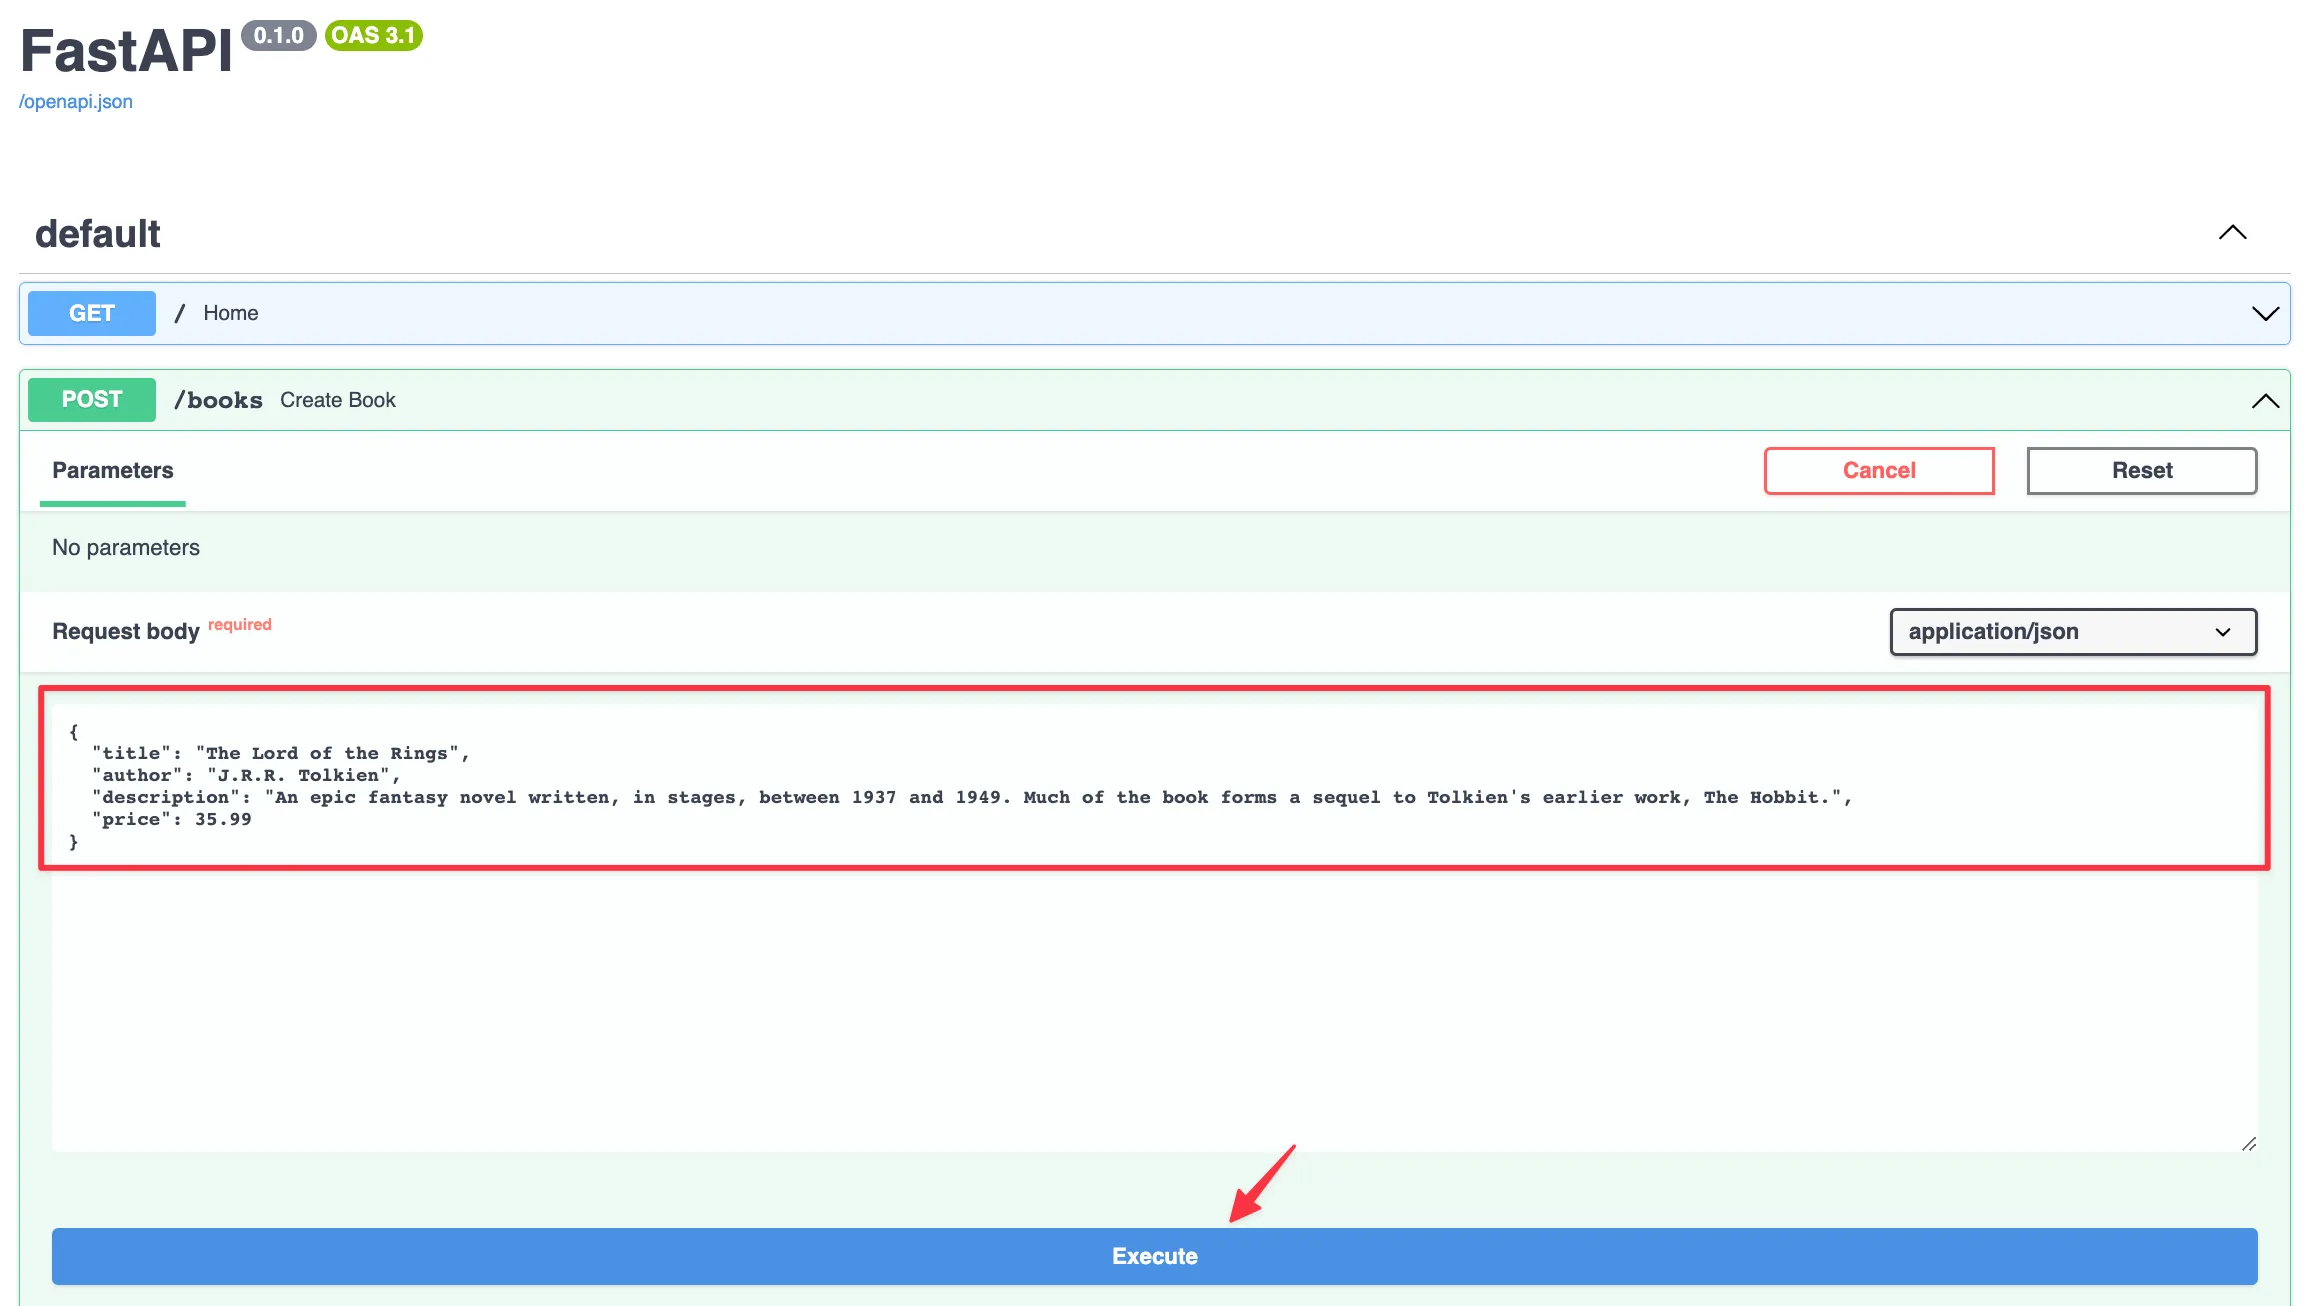
Enter the required data and click the Execute button. You should get a 201 response with the new book record. You can also check the database to see if the record was created.
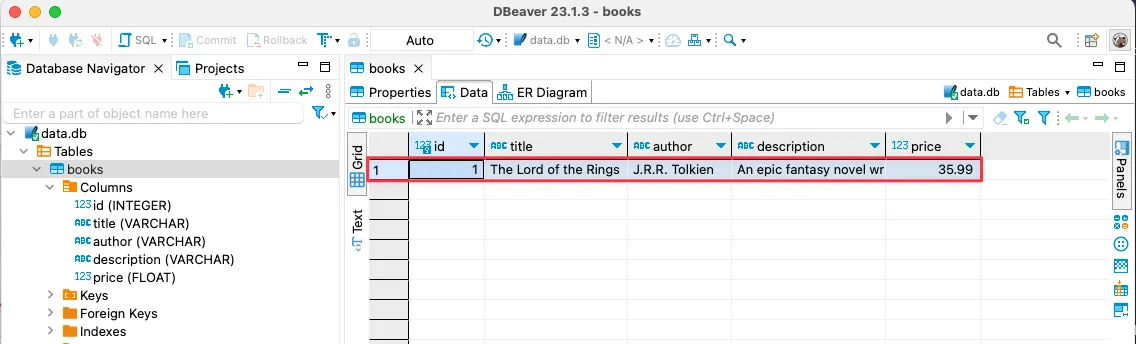
You can add a few more books to the database before we continue. Here’s what my database looks like:

Read
Get all books
Next, let’s add the read operation to get all the books from our database. In our main.py file, add the following code:
from typing import List
@app.get("/books", response_model=List[Book])
async def get_books():
query = books.select()
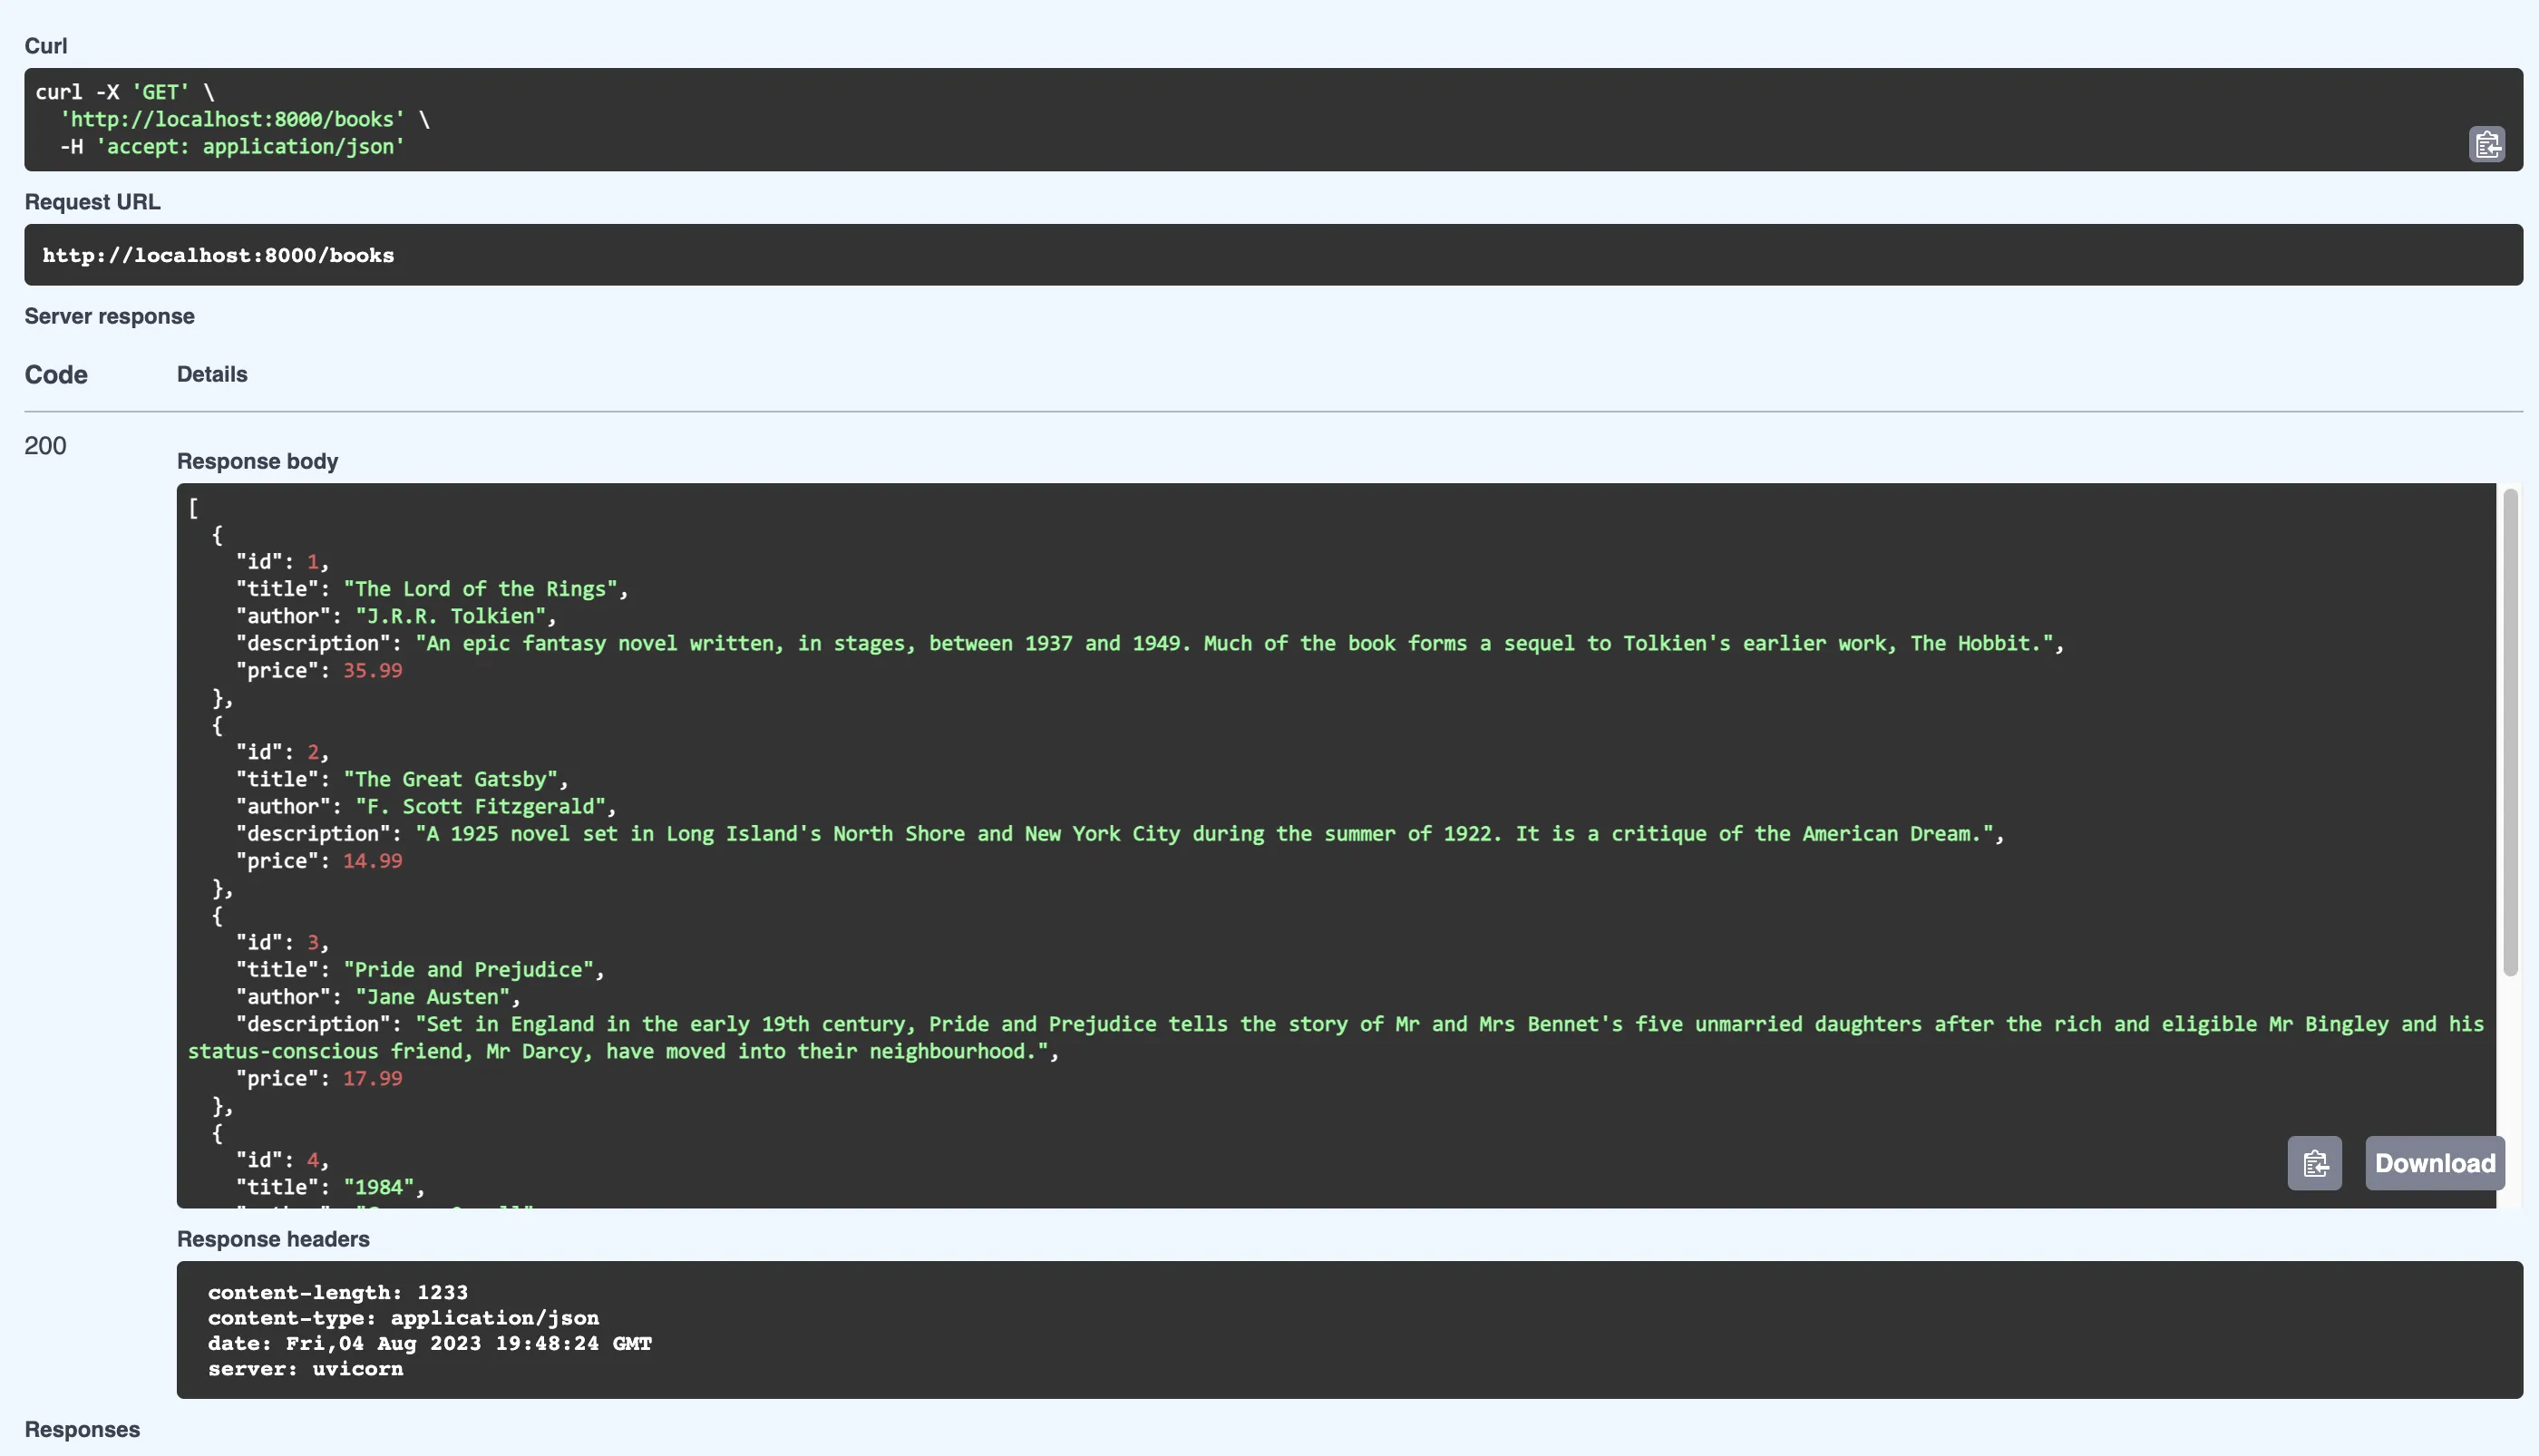
return await db.fetch_all(query)Go to your interactive docs and you should see the new GET endpoint /books. Open it and click the Try it out button. You should see the following:
Get a single book
Next, let’s add the read operation to get a single book from our database. In our main.py file, add the following code:
from fastapi.exceptions import HTTPException

@app.get("/books/{book_id}", response_model=Book)
async def get_book(book_id: int):
    query = books.select().where(books.c.id == book_id)
    book_record = await db.fetch_one(query)

    if not book_record:
        raise HTTPException(status_code=404, detail="Book not found")

return book_recordNotice the use of an HTTPException to raise a 404 response if the book is not found. We import
the HTTPException class from the fastapi.exceptions module.
Go to your docs and you should see the new GET endpoint /books/{book_id}. Open it and click the Try it out button. Add a book id, you should see the following response:

Update
Next, let’s add the update operation to update a book in our database. In our main.py file, add the following code:
@app.patch("/books/{book_id}", response_model=Book)
async def update_book(book_id: int, book: BookUpdate):
    book_query = books.select().where(books.c.id == book_id)
    book_record = await db.fetch_one(book_query)

    if not book_record:
        raise HTTPException(status_code=404, detail="Book not found")

    update_data = book.model_dump(exclude_unset=True)
    updated_book = dict(book_record)
    updated_book.update(update_data)

    query = books.update().where(books.c.id == book_id).values(**update_data)
    await db.execute(query)

    updated_book_query = books.select().where(books.c.id == book_id)
    updated_book_record = await db.fetch_one(updated_book_query)
return updated_book_recordNotice the use of the BookUpdate model. This model is similar to the
Book model but it doesn’t have the id field. This is because we don’t
want to allow the user to update the id field.
Let’s break this code down:
- We define a new endpoint
/books/{book_id}. This endpoint accepts aPATCHrequest. Thebook_idparameter is used to identify the book to update. - We use the
book_idto query the database for the book record. If the book is not found, we raise a404error. - We use the
model_dump()method to get the data from thebookobject. We passexclude_unset=Trueto the method. This tells Pydantic to exclude fields that are not set. This is useful because we don’t want to update a field if it’s not set. - We convert the
book_recordto a dictionary and update it with theupdate_data. This is because thebook_recordis aRowProxyobject and we can’t update it directly. - We use the
update_datato update the book record in the database. - Finally query the database again to get the updated book record and return it.
Go to your docs and you should see the new PATCH endpoint /books/{book_id}. Open it and click the Try it out button. Add a book id and the data you want to update. In our case, I’m updating the book price to 49.99 You should see the following response:

Delete
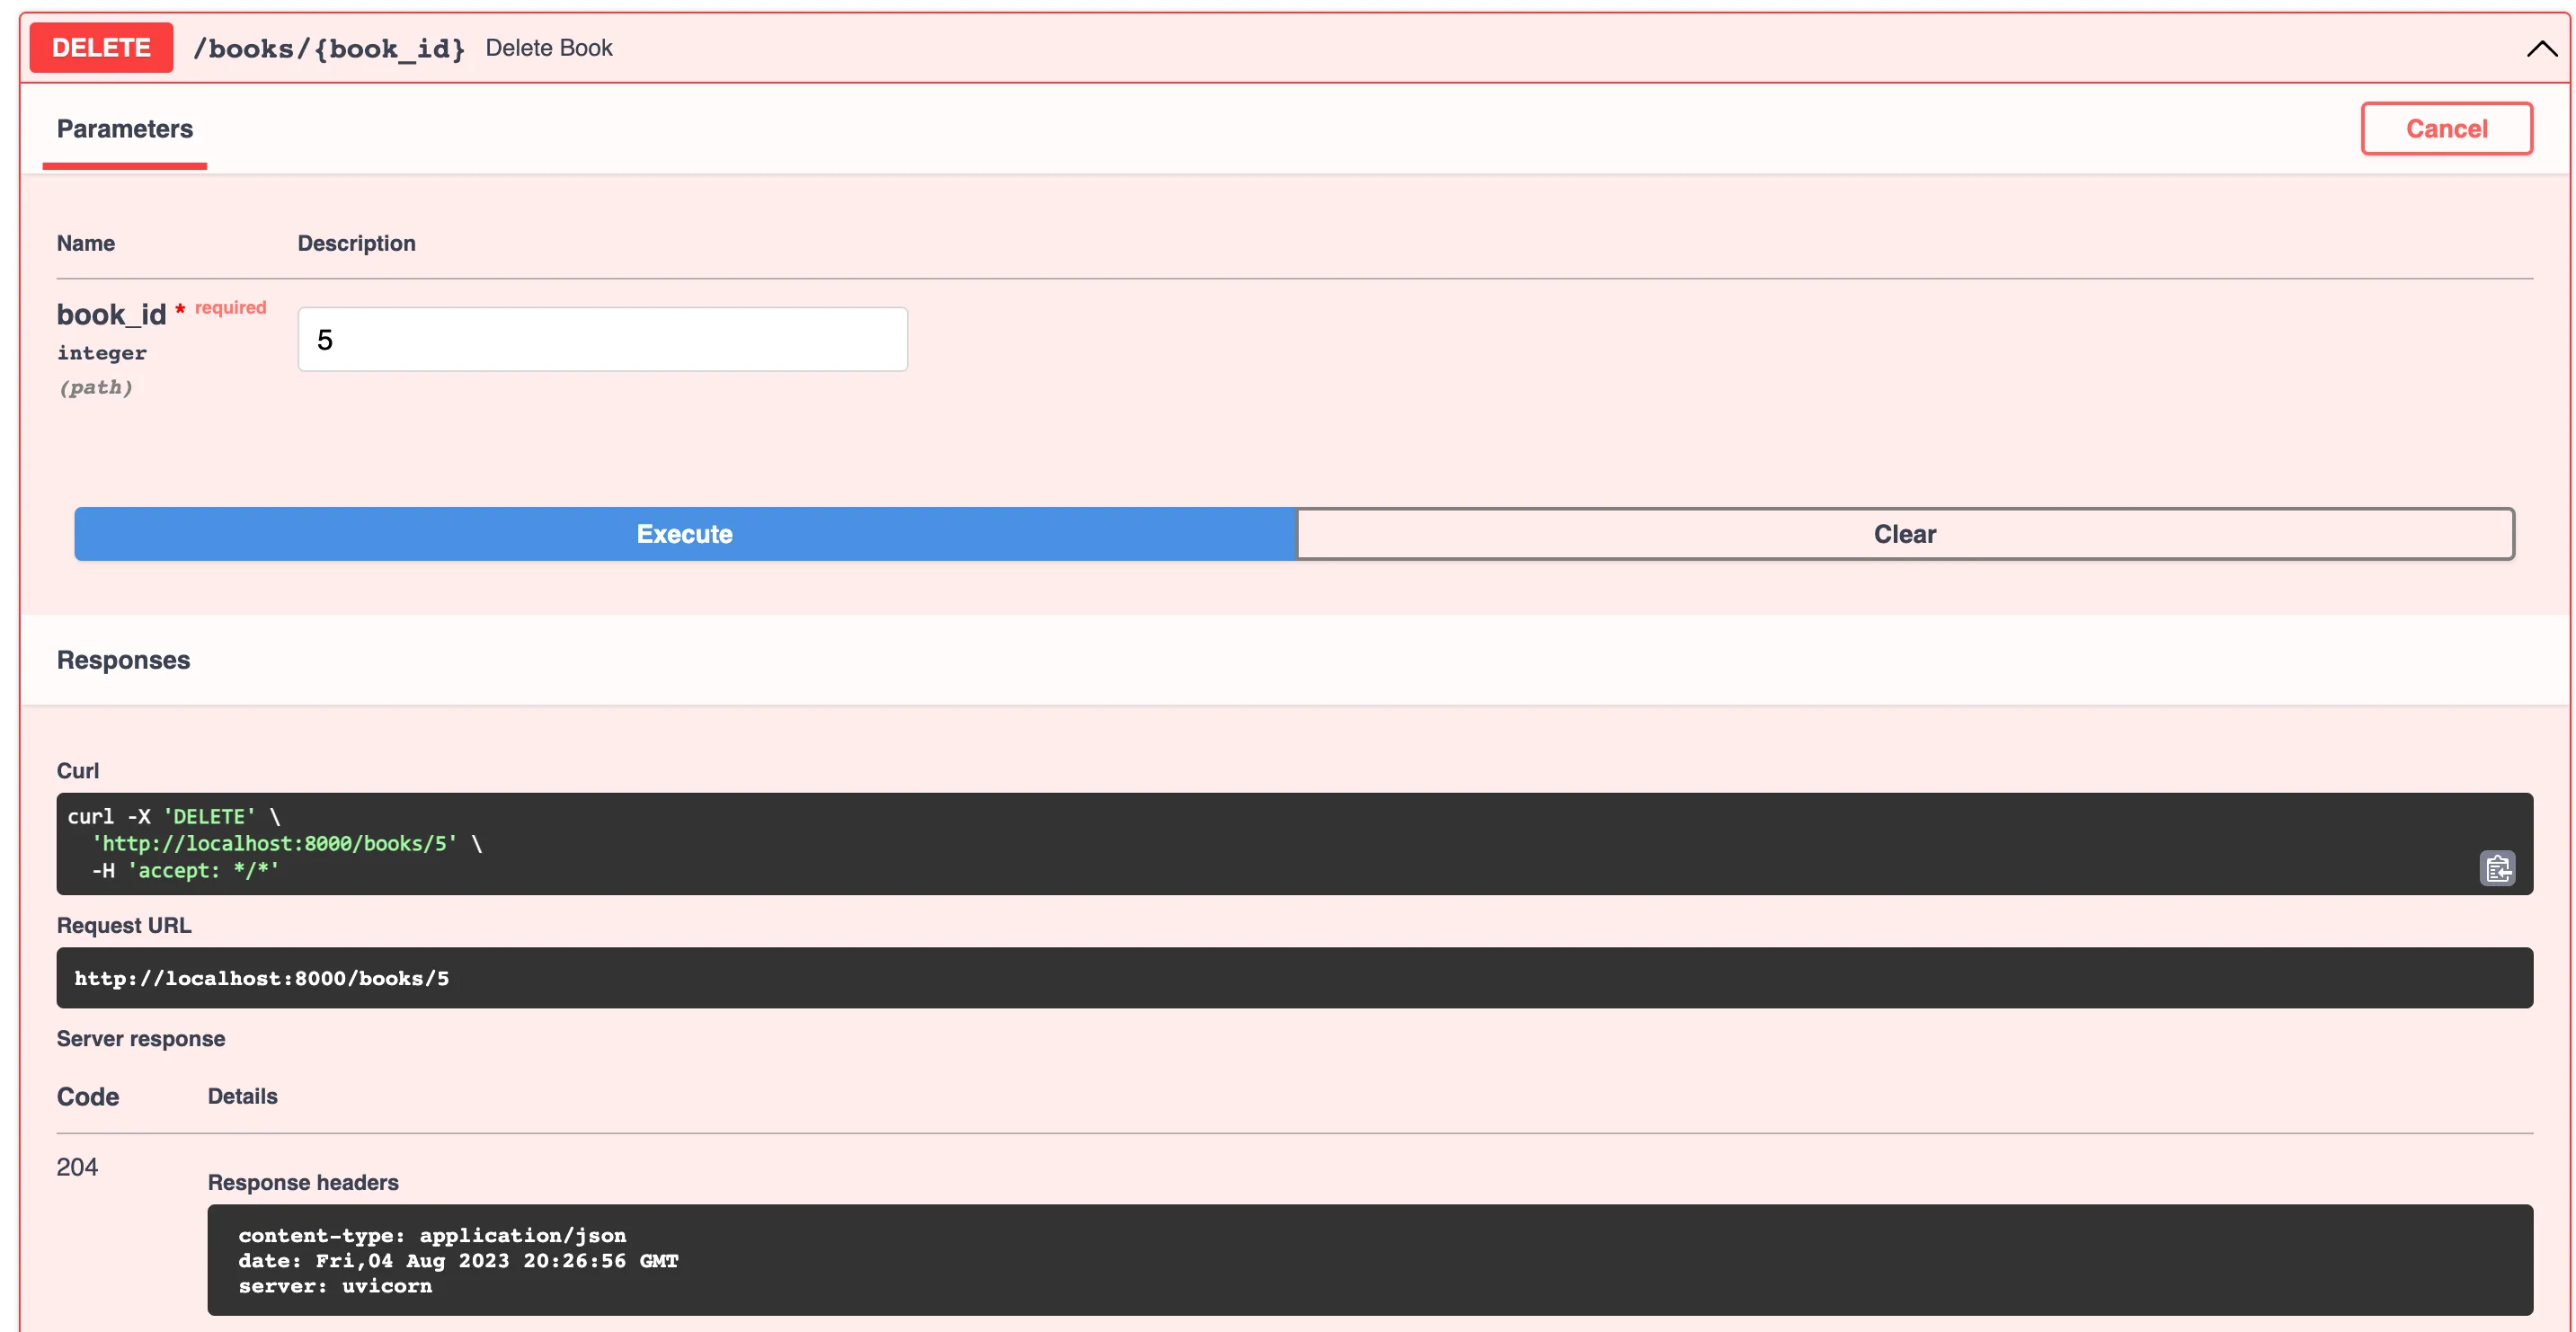
Next, let’s add the delete operation to delete a book from our database. In our main.py file, add the following code:
@app.delete("/books/{book_id}", status_code=204)
async def delete_book(book_id: int):
    query = books.delete().where(books.c.id == book_id)
    await db.execute(query)
    return None
Go to your docs and you should see the new DELETE endpoint /books/{book_id}. Open it and click the Try it out button. Add a book id, you should see the following response:
Conclusion
FastAPI is an empowering tool for crafting APIs in Python. Its alignment with Python’s type hinting system ensures that your applications are not only swift to build, but also robust and secure. Plus, its seamless support for asynchronous programming makes it an excellent choice for real-time applications and long-running requests.
We only scratched the surface of what FastAPI can do in this post. I encourage you to check out the official documentation to learn more.
I this post helps you get started with FastAPI.
You can find the complete source code for this project on GitHub.